
Stucco can be a beautiful addition to your home, but it’s not impervious. Damaged stucco allows moisture to seep into the walls, damaging the sheathing and framing.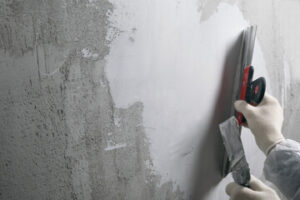
Small hairline cracks can be repaired with exterior latex paintable caulk. But excessive damage needs to be addressed with a full restoration process by stucco contractors. For professional help, call Stucco Repair Philadelphia now!
Stucco is a beautiful choice for the exterior of homes and commercial buildings, but like any other material, it can be damaged by weather, building settlement, and general aging. If not repaired quickly, even minor damage can turn into major problems and cost more to fix than the original stucco cost. Knowing what to look for and how to respond can prevent these problems from getting worse and save you the expense of a complete replacement.
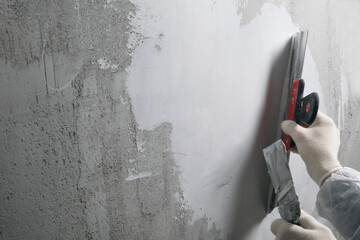
Stucco repairs start with examining the surface for signs of damage or discoloration. A little cracking is considered normal, but larger cracks should be examined carefully and repaired as soon as possible to prevent moisture from penetrating the wall and causing further damage. Small cracks can be fixed with joint compound, but larger ones may require a more complex repair.
Loose stucco is another sign of trouble and should be removed from the affected area with a hammer or chisel. Loose stucco is often spongey to the touch and bulges out at the ends, indicating that it has been weakened by moisture. A hammer can also be used to tap on the stucco to see if it sounds hollow; if it does, the stucco should be removed and replaced.
It is also important to inspect the metal lath underneath for any rust or water damage and to trim away any house wrap or felt paper that is around the exposed lath. The underlying wood should be in good condition, but if not, it should be replaced. A good contractor will use galvanized steel lath to ensure that the new stucco will not rust.
While removing the loose stucco, be sure to wear eye protection and a dust mask. This job can be messy, but it is necessary to make the best stucco repair possible.
If you are repairing an area of damaged stucco that is overly waterlogged, you may be able to save the old stucco by cutting away just enough to expose a layer of wire mesh beneath. This will prevent further water damage to the wall and allow you to replace the rotting mudslide underneath.
Applying the New Stucco
Stucco is a durable and attractive building material that adds value to your home. It also provides excellent insulating and fire resistance and is resistant to moisture. But like any surface, it’s not impervious to damage and wear. And if you don’t keep up with stucco maintenance, what might look like minor flaws today could escalate into big problems in the future.
While it’s possible to fix small cracks and surface damage yourself, it’s better to call a professional stucco contractor to do the job right. In addition to a better result, professionals will be able to spot hidden problems, such as water intrusion, that can cause structural framing to rot and mold contamination of the sheathing.
To prepare for applying the new stucco, sweep and whisk the area to remove any loose particles and dirt. If necessary, a pressure washer can be used to clear the area. Be careful not to use the “water jet” setting. It’s best to apply the pressure washer from a safe distance to prevent the stucco from peeling off.
Before you apply the new stucco, check for any signs of rust on the metal mesh that holds the stucco in place. If it’s rusted or if the mesh is damaged in any way, you will need to replace it. Then, a coat of bonding agent should be applied to the repaired area to ensure that the new stucco sticks to the old.
Next, the cracked area should be chiseled with a cold chisel to widen it by at least a quarter inch. Using a wire brush, any loose debris should be removed. If there is any lath or house wrap on the wall, remove it with tin snips. Then, the new stucco can be applied over the area.
Apply the first coat, called the “scratch coat,” with a trowel. Let it dry according to the manufacturer’s instructions. Then, apply the second coat, known as the brown coat. Let it dry as well, then etch the surface of the brown coat to help the third and final coat stick to it. Once the patch has dried, it can be painted to match the surrounding stucco.
Applying the metal mesh
Stucco is a popular and durable finish for buildings and homes, but it can also be vulnerable to damage. Small cracks may seem like cosmetic problems, but they can actually allow rainwater to seep behind the stucco, causing lasting structural damage. If you notice these signs of damage, have the cracks repaired right away.
Moisture management is a key factor in plaster deterioration, and it’s one of the major causes of rot, mold, and other problems. This moisture can enter a building through cracks, gaps in the roof, chimneys, and window and door openings. It can also get behind the sheathing and framing, where it can cause water intrusion.
Portland cement plaster is a porous material that allows moisture vapor to pass through it, so it’s important to have a good moisture management system in place. If you don’t, moisture can rot the sheathing and framing and cause mold and other issues that can be costly to repair.
Ideally, the sheathing and framing should be sealed with silicone caulking and a waterproof coating to prevent moisture from getting behind the walls. If these protective measures have been taken but the stucco still has water damage, then the problem can usually be solved by replacing the damaged sections of the plaster. However, it’s important to understand that this method is only a temporary fix and will not eliminate the need for future repairs or replacements.
Before starting to replace the plaster, it’s important to remove any loose or crumbling pieces of stucco. You should chip away the old plaster until you reach the metal lath beneath. Once you’ve done this, remove any broken bits of metal mesh that are sticking out of the wall with a pair of snips. Then, apply a coat of grade-D builder’s paper to the wood lath and affix it with roofing nails.
Once the paper has been applied, apply a thin layer of stucco over it to seal the paper and make sure that any remaining bits of metal mesh are completely covered. This first layer is called the scratch coat and is usually made up of a mixture of 1 part bonding agent to 4 parts water. Once the scratch coat has set and dried, apply a brown coat over it. This can be the same shade as the original plaster or a different color, depending on your preference.
Painting the New Stucco
Whether it is time for a touch-up, a full repaint, or just cleaning, stucco walls require special care when it comes to painting. It is important to use a primer that is compatible with stucco so the new paint adheres properly and does not soak into the surface, leading to cracking or flaking in the future.
It is also important to inspect your stucco at least once a year for signs of damage. This could include paint chipping or cracking, as well as mold growth and a mildew smell. Inspecting for these problems early will help prevent the need for expensive repairs down the road.
If you do spot the beginning stages of a stucco repair project, it is important to bring in a professional as soon as possible. Stucco contractors are trained to spot the signs of damaged or old traditional stucco and can assess the situation quickly to determine if the problem is due to faulty installation or moisture that has somehow gotten behind the stucco.
For smaller cracks, a simple joint compound may work. However, larger cracks may need more extensive repair. It is best to consult a professional for this kind of repair, as there are a lot of variables that can affect the outcome.
In some cases, the best solution is to remove the entire section of damaged stucco and replace it with fresh material. If you decide to do this, make sure you are using Portland cement and not lime. Portland cement is more durable and able to withstand moisture. It is also recommended that you wait at least 60 days after the new stucco is applied before painting it.
If the cracks in your stucco are more serious, you will need to use a different type of product to fix them. There are a number of commercially available products meant to fix this sort of issue, including sanded acrylic exterior caulk.
Be sure to follow the instructions for use, as these can vary depending on the product. When using sanded caulk, make sure to remove any loose debris first and then apply the product with a putty knife. After applying the product, smooth it with your finger and let it dry according to the manufacturer’s directions.